
Business Central - Don’t underestimate the power of Workflow
Business Central workflow have been around for quite some time. But did you know that it can accommodate simple requirements without the need for a developer? Workflow is not just for approval, you can also use it to do simple validations.
One of the most common requests I’ve received in the past is adding a simple validation or message/notification that a field should have a specific value before moving forward. One of those examples is making sure that a Purchase Order line does not have a Unit Price that is equals to $0 or maybe a specific amount. Additionally, you may want to have a pop-up message letting know the user that is not allowed and prevent them from releasing a Purchase Order. Immediately, you may think that you’ll need a developer to add an extension to check on that field at the time of releasing the document. Usually, OnRelease, a developer may subscribe to and add OnValidate to that field.
Well, you no longer need to have a developer to do this if your requirement is simple. Business Central workflow can help you achieve the scenario above. You can do this on Business Central as well as NAV now.
Let’s go ahead and create this workflow by searching for “Workflow” in Business Central or NAV. When creating a new workflow card, you can either copy from an existing workflow template or create a new one from scratch. Since most of the workflow templates are approval related, I am going to create a new workflow from scratch.

Provide a unique Code, add detailed description of what the workflow is for and set the category. In this example, you want to use the “PURCHDOC” since we are dealing with Purchase Documents.
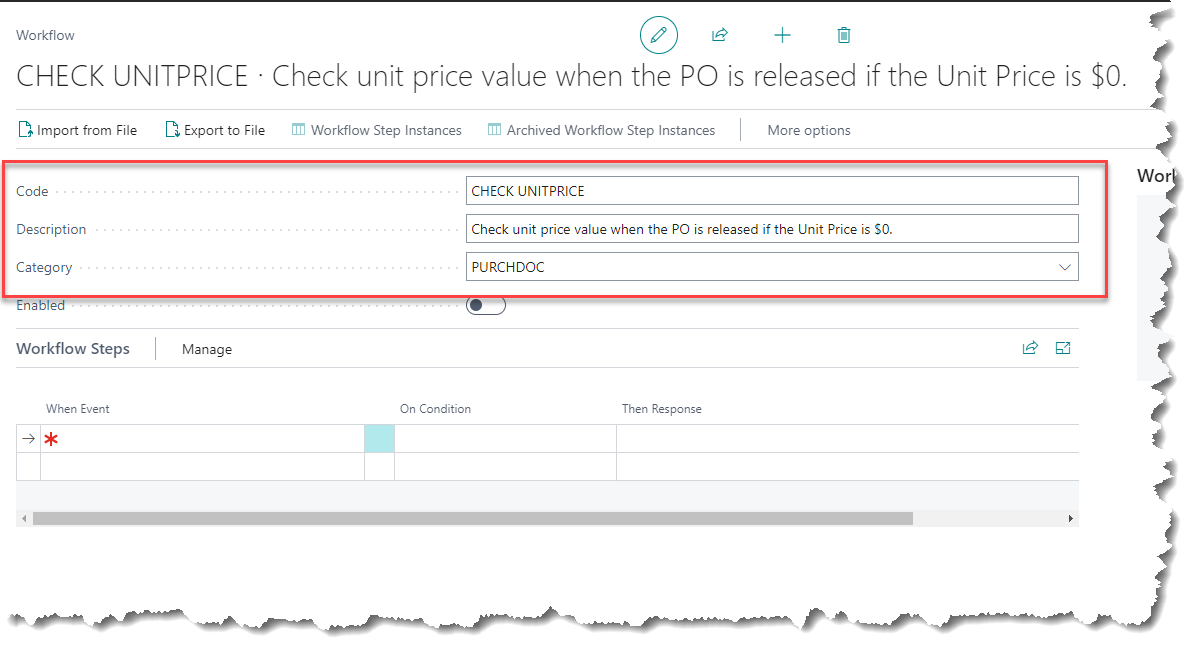
The next steps are to add the event, condition, and the response.
When Event: Specifies the workflow event that triggers the related workflow response.
On Condition: Specifies the condition that moderates the workflow event that you specified in the Event Description field. When you choose the field, the Event Conditions window opens in which you can specify condition values for predefined lists of relevant fields.
Then Response: Specifies the workflow response that is triggered by the related workflow event.
With the scenario mentioned above, I am going to use “A purchase document is released” event and click OK.

For this event to be true, I need to apply the conditions that needs to be met before moving into the response stage. In this example, the workflow is only true if the Purchase Line type is Item, and the Unit Price ($) is $0.

My workflow response requirement is for a message to pop up and inform the user that you cannot have a Unit Price of $0 and for the document is to remain as opened. By default, since the event is releasing the document, it is important that your response needs to make sure that the document is reopened or open status. And also, by default, the “Reopen the document” is not an option initially, so you’ll need to enable that from the Workflow Event/Response Combination.

Note: Add the Reopen the document response to the event combination by navigating to Workflow Event/Response Combination page, highlight the “A purchase document is released” event, click “Next Set” and check the box for Reopen the document response to make it available as an option.


Once you have your workflow created, you will need to enable it by checking the Enabled Boolean.

Navigating back to your purchase order to test the scenario, attempt to release the purchase order with $0 on the Unit Price field, you should receive the message and the PO status should remain “Open”.

I hope you find this walkthrough helpful and in certain scenarios, you may not need a developer for some simple checks and validation by utilizing the built-in Workflow! If you have any questions or comments, leave a comment below! Thank you and have a wonderful day!