Basics of Sales Price in Business Central
Hello and welcome back to another blog post! With a series of “Back to Basics”, I will be covering the Sales Prices feature within Business Central. We will cover a few scenarios on why utilizing Sales Prices will allow for organizations to be efficient and accurate when it comes to pricing structure and strategy.
If you are an organization who sells and item in different price levels due to ‘bulk’ pricing or maybe some promos in a specific amount of time, then you will benefit from this tool within Business Central.
Scenario: Let’s take for an example an item within Business Central. I have a new desk item that came into inventory and I want to push for sales to get into market. So what I would like to do is adjust the sales price for the first month.
With the scenario above, I would navigate to the item card and click “Prices & Discounts” at the action bar and click on Sales Prices.
Sales Prices menu pops up and this is where you will be populating the information for the item. A few things to note as we are doing this for a single item, you can perform Sales Price for Customer level as well but for this blog post, we’ll focus on a single item:
Sales Type: Specifies the sales price type, which defines whether the price is for an individual, group, all customers, or a campaign.
Customer
Customer Price Group
All Customers
Campaign
Sales Code: Specifies the code that belongs to the Sales Type.
Item No.: Specifies the number of the item for which the sales price is valid.
Unit of Measure Code: Specifies how each unit of the item or resource is measured, such as in pieces or hours. By default, the value in the Base Unit of Measure field on the item or resource card is inserted.
Minimum Quantity: Specifies the minimum sales quantity required to warrant the sales price.
Unit Price: Specifies the price of one unit of the item or resource. You can enter a price manually or have it entered according to the Price/Profit Calculation field on the related card.
Starting Date: Specifies the date from which the sales price is valid.
Ending Date: Specifies the calendar date when the sales price agreement ends.
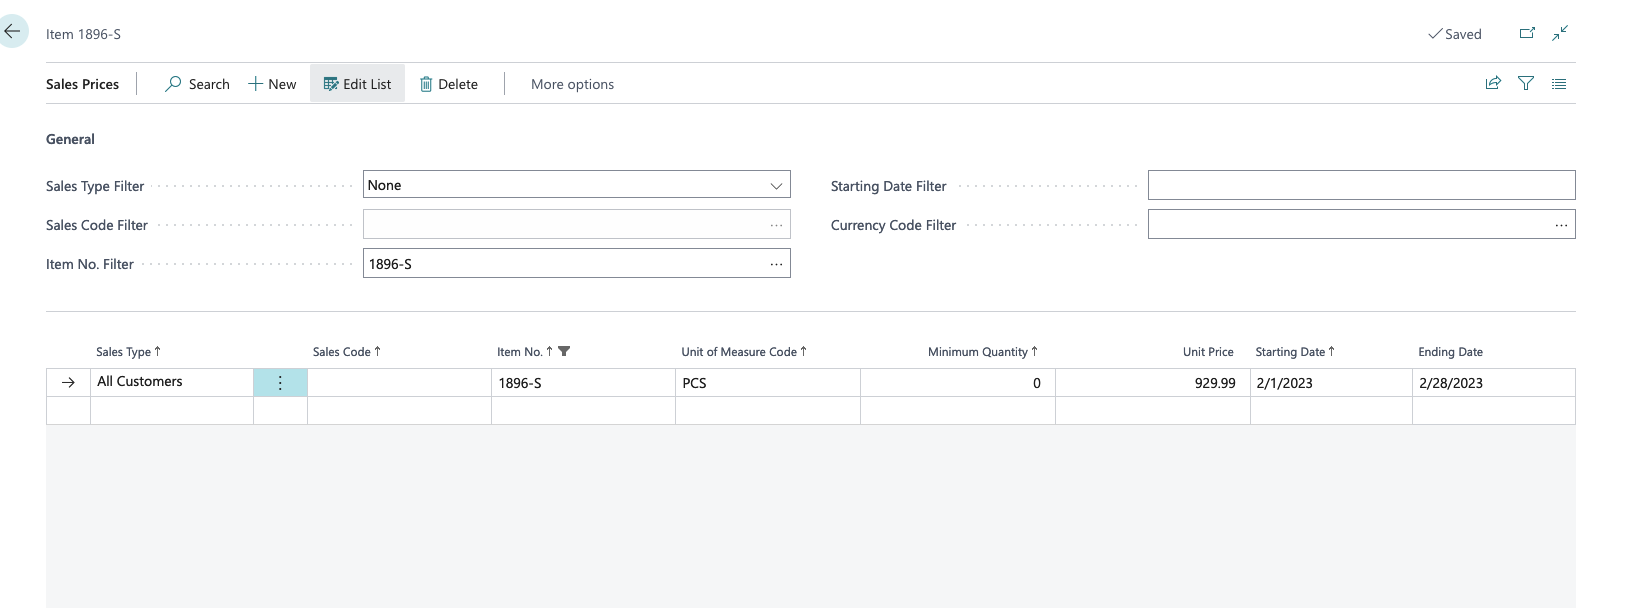
Here’s how I would set up the Sales Price based upon my scenario I noted above. Since I would like the item to be on ‘sale’ for the entire month, I would apply the Sales Type as “All Customers” which we can then ignore the Sales Code since it is for everyone. If you chose the other options, then you can populate the Sales Code, example, for a specific customer only.
The other field I populated is the Unit Price, Starting Date, and Ending Date. The item is normally $1000, I am going to set the price for this item at $929.99 ONLY within the date range I’ve provided, between 2/1/2023 and 2/28/2023. If you leave the dates empty, the price for the item will be indefinite. There is no minimum quantity because I want to push revenue for this new item. However, you can set a minimum quantity before the sales price is considered.
Now that I have my Sales Price configured, let’s test this out by creating a new Sales Order. If you are unsure how to create a new Sales Order, please refer to an earlier post.
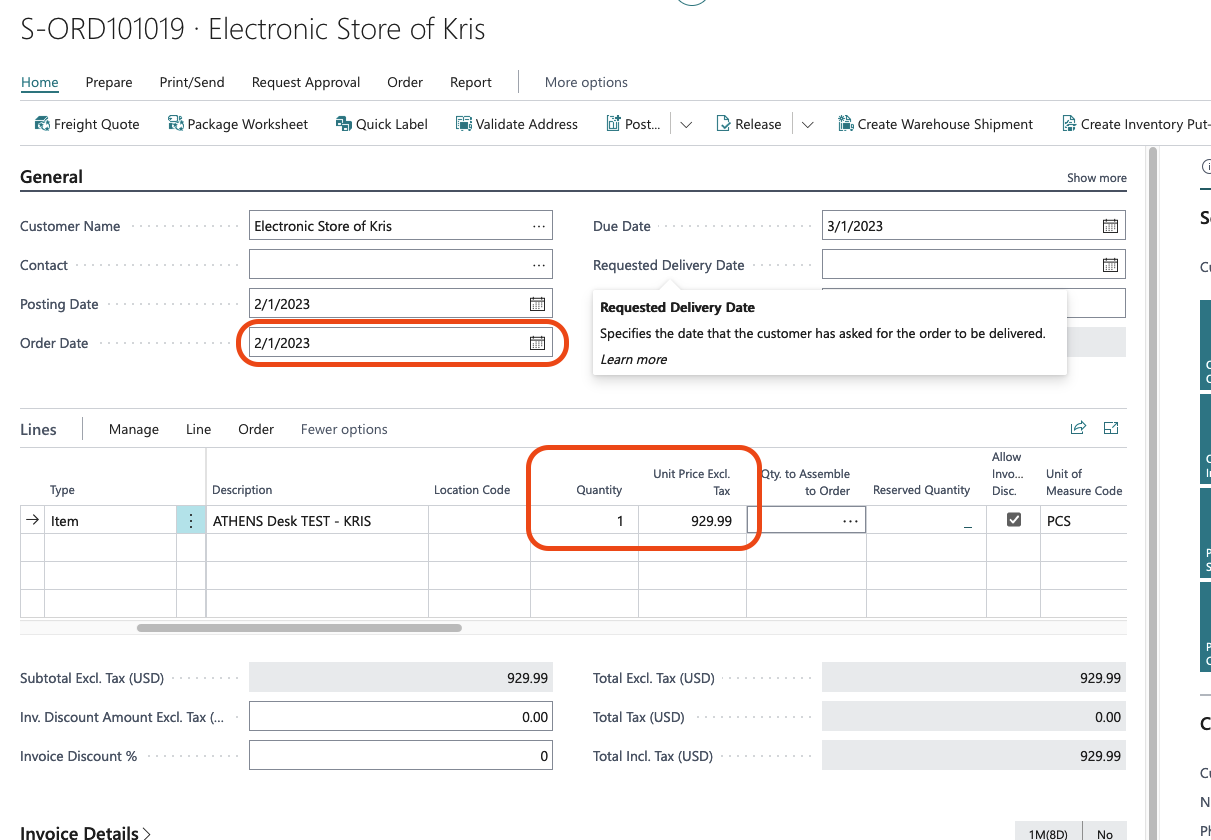
As I created a new Sales Order, you will notice that the item that we set up, is now respecting the Sales Price we configured. Please note the Order Date as well. If the date is outside of the date range of the Sales Price, it will take the MSRP price from the item card.
There you go! The Sales Price functionality is quite flexible. You can utilize this function with a group of customers, a single customer, a specific item, and so many other scenarios you can think of. On a future post, we will discuss how you can do this in a percentage level via Sales Discount.


